Best method to remove Downloader.Quanader!g1 from infected PC
I am unable to do any work on my system as this infection Downloader.Quanader!g1 comes to my system. I have run full scanning of my system, but it stills exist on my browser. What should I do to remove this virus permanently from my system. It sneaks silently into my browser and causing much more trouble. Sometimes it freezes up my system. Then I need to restart my system. It just disable my access to my important system files and left me doing nothing. How can I fix this issue? Please help. Downloader.Quanader!g1 is defined as a powerful Trojan infection that will activate lots of harmful and redundant tasks and processes to eat up all your system resources and will cause big trouble to your system. It is reported for involving activities such as stealing personal information, malware distribution, or opening backdoor for its hacker. Thus, when you open some Spam email attachments, install freeware program, visit some fake sites and download other free files from insecure websites.
Once infiltrating into system, Downloader.Quanader!g1 will alter your registry to make it a start up service of your system, after that it will cause to execute many harmful services as your PC get launched. It will automatically connects malware server and downloads more malicious threats such as adware, spyware, browser hijacker and much more programs without your approval. Hence, once get installed on your system, user will sustain serious problems. It will collect your all data an provide them to cyber criminals. They will hijack your browser to display Spam ads, and fake programs that will disable your apps and cheat you to buy its full license. As longer it resides, it will mess up everything, thus, its high time to get remove Downloader.Quanader!g1 from your PC.
Expert Recommendation:
Downloader.Quanader!g1 is a fatal threat and remove it as soon as possible. To get rid of it completely, download Downloader.Quanader!g1 Scanner

Manual Methods to Delete Downloader.Quanader!g1 from infected PC :
Downloader.Quanader!g1 is very lethal and harmful spyware which badly effects your windows PC. Regarding its removal, here are some of the common manual methods which will help you to remove Downloader.Quanader!g1 from your PC :
Start windows in safe mode : for this press "F8" during the system start up. safe mode runs the basic programs of your system where your can fix your problem easily.
Make empty your IE cache : open your internet explorer → tools menu → Internet option, in the general option click on "Delete files" option which will delete cookies and internet file which are affected with the malware and spyware.
Stop the active processes : Using Windows Task Manager, you need to kill the associated processes of Downloader.Quanader!g1 running on the PC.
Add or Remove Programs : To remove the infected application go to add or Remove program and then uninstall the programs.
Delete the system registry files : Downloader.Quanader!g1 spyware edit your windows registry incorrectly which is the result of system errors, blue screen and system crashes. Open the windows registry editor and remove all the infected malicious and corrupted registry files.
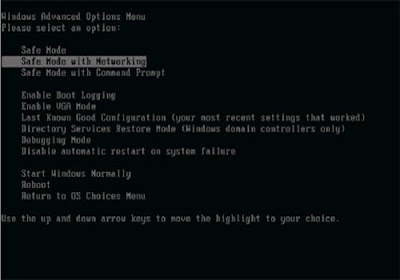
Steps To Reboot Your Computer In Safe Mode
For Windows XP | Vista | Win7
1. At, first restart your computer.
2. Press F8 button continuously once the PC start booting and then select the option to enter Safe Mode with Networking.
For Windows 8
1. Open your PC and press on to start button and then go to control panel from the menu option.
2. Then opt for System and Security, to select Administrative Tools and then goto System configuration.
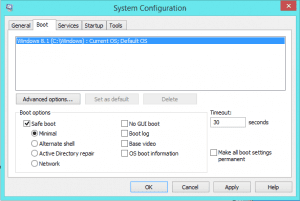
3. After that click on the Safe Boot Option and click on OK button. It will open a pop-up Window, and then Restart the PC.
For Windows 10
1. Start your PC and then goto Menu option.
2. Press SHIFT key on the keyboard, to select the Restart option. This will reboot Win 10.
3. Now select the Troubleshoot icon, which is followed by advanced option in the Startup settings. After that click on Restart. It will give you the option to reboot, now select Enter Safe Mode with Networking.
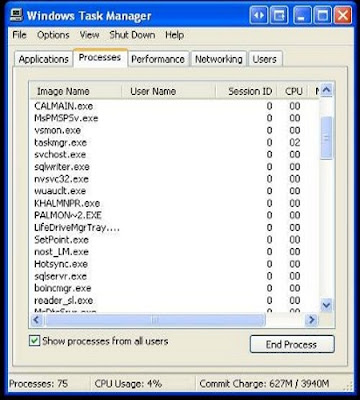
Remove Downloader.Quanader!g1 From Task Manager On Windows
Steps To End The Running Process Related To Downloader.Quanader!g1 Using Task Manager
1. Open Task Manager by presssing Ctrl+Shift+Esc all together.
2. Then, Click on processes to Find Downloader.Quanader!g1.
3. Now Click and select End process to terminate Downloader.Quanader!g1.
Remove Downloader.Quanader!g1 Created Files From Registry
1. Open Registry by Typing Regedit in the Windows Search and then press on Enter.
2. Open the registry entries, and then press CTRL+F together and type Downloader.Quanader!g1 to find the entries.
3. Once the entries is find out, delete all Downloader.Quanader!g1 named entries. In case, if you are unable to find it out, then you need to look up for it on the directories manually.
HKEY_CURRENT_USER—-Software—–Random Directory
HKEY_CURRENT_USER—-Software—Microsoft—-Windows—CurrentVersion—Run– Random
HKEY_CURRENT_USER—-Software—Microsoft—Internet Explorer—-Main—- Random
Remove Downloader.Quanader!g1 From Control Panel On Windows
For Windows XP | Vista | Win7
1. First, click and select on Start Menu.
2. Then, goto Control Panel and select the program list.
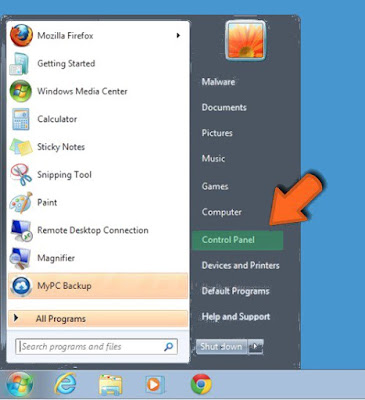
3. Now Click on uninstall program button.
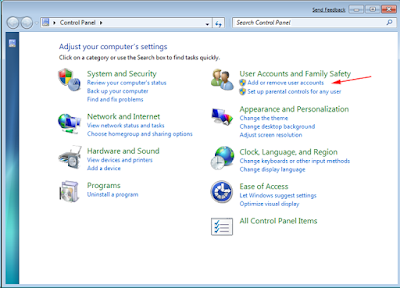
4. Select Suspicious program related to Downloader.Quanader!g1 and right click on it.
5. At last select Uninstall option.


For Windows 8
1. At first, click and select "Menu Option".
2. Now goto setting option and select it.
3. Then click on Control Panel.
4. Select on Uninstall a program Option and right click on program that are associated to Downloader.Quanader!g1 and at last Uninstall it.

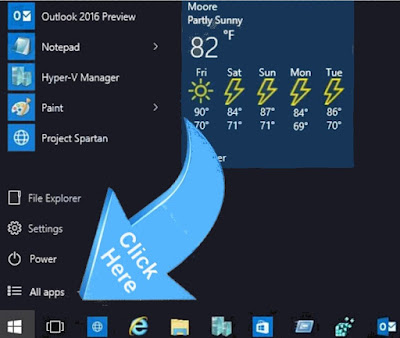
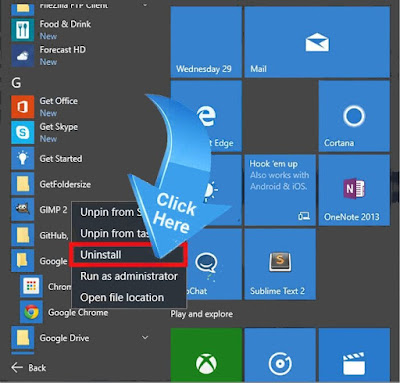
For Windows 10
1. Click and Select on to Start Menu.
2. Then, Click On All Apps.
3. Select Downloader.Quanader!g1 and other Suspicious program from the program list.
4. Now, click onto select Downloader.Quanader!g1 and finally Uninstall it from Windows 10.

No comments:
Post a Comment